Reading Music
With various students I’ve tried different methods over the years to make the reading of the dots and lines on the page as accessible as possible. The verdict? All it takes is some good old mathematical logic, and a little intellectual ‘elbow grease’ to get into the grind of things, and surely enough, things start to make sense the moment we start stringing up all this information together, in the form of a simple piece! let’s start with some self-discovery to help illustrate what we’re really dealing with :)
STEP 1:
A little self-awareness experiment.
Take a look at your hands. Give every single finger a wiggle, up-down and left-right, trying your best to move that single finger and nothing else. What do you notice? Which two neighbouring fingers seem to always be affecting the other?
Maybe you’ve got it right, so here’s the answer! The middle and ring fingers, being the two center fingers, have a shared nerve which makes them naturally bound to the other’s movements. This poses a unique challenge to all instrument-playing musicians, but not to worry! We have plenty of ways to develop finger independence in our learning process! Also, if you happen to have all the other fingers wiggle in unison with whichever single finger you were trying to control individually, fret not! Me too, if I’m being honest :)))
💪💪💪
So, the whole point of this little experiment was to illustrate why we place our fingers the way we do on the violin, and at VSG, this is what we call the ‘neutral’ or ‘normal’ first position. It looks a little something like this:
notice the natural spaces between each of the fingers?
Whilst the middle two fingers touch, the first two fingers and the last two fingers don’t! This gives us the natural configuration of the first-position hand: denoted by numbers per finger, starting with 1 for the index finger: 1__23__4 😜
And voilà, we’ve just discovered the most important basis for finding our notes on the violin! CONGRATS FOR MAKING IT UNTIL HERE!!!
Step 2:
Understand that every finger-space represents the ‘home’ of a note.
just imagine…
each note living in its very own home, and a whole long staircase to join them all up. And, much like real houses, not all notes occupy the same amount of space - something that we measure in ‘steps’. Lucky for us, the combinations all start from half- or whole-steps. As soon as we learn to recognise this, learning to read and to understand the relationships between notes becomes easy… all we need to do is to count the number of half- or whole- steps!
Step 3:
Understand how all of this fits into musical notation
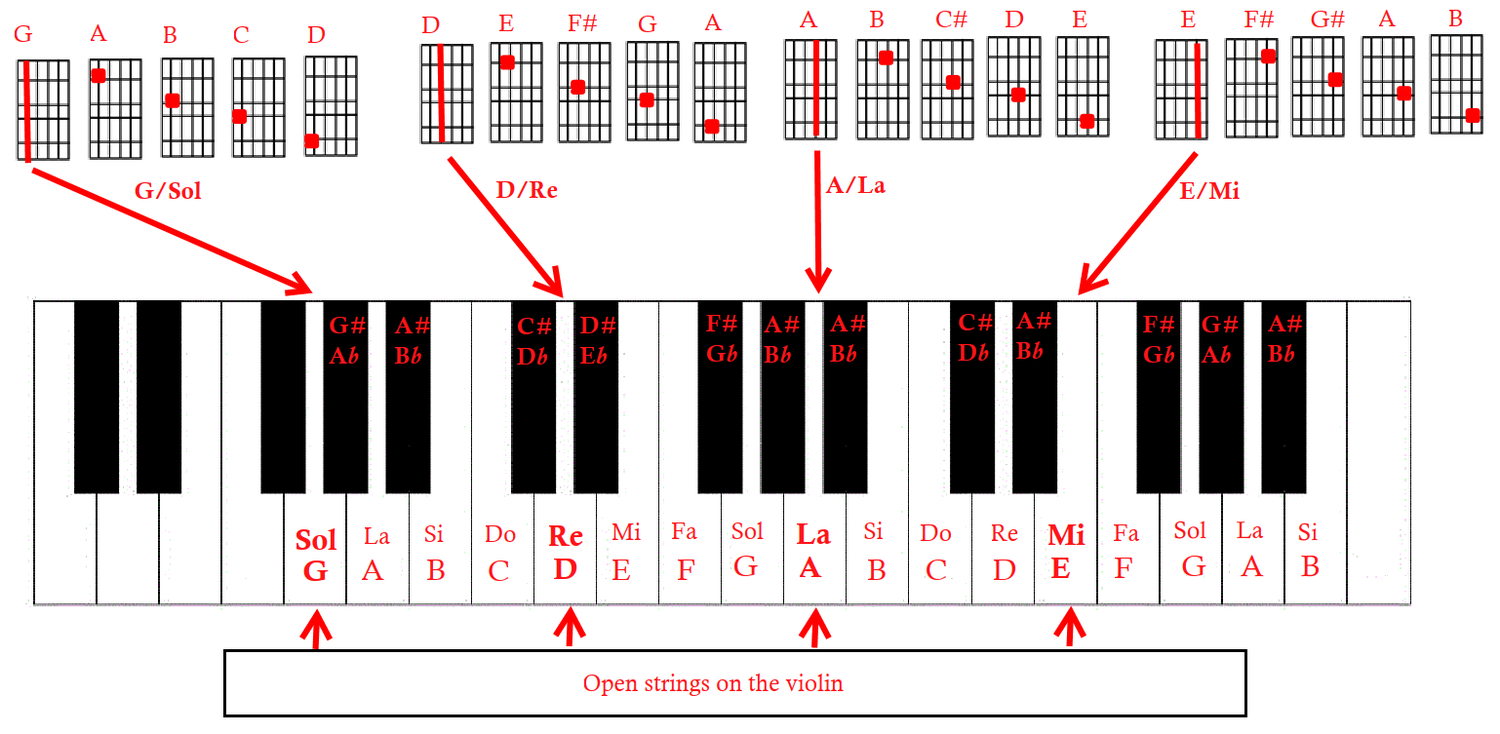
Broadly speaking, the notes that we play are easily recognised in the form of the piano keyboard. You might be thinking, ‘but I’m here for the violin! What does that have to do with the piano?’, and to that, I’ll say, give it a minute! The convenience that the presentation of the piano keyboard offers us is the simple spelling-out of all the half- and whole-steps we’d ever need to understand the way music is written on paper, and it helps that everything is laid out, well, in black and white! Let us consider the piano keyboard at the bottom of this following diagram:
Let’s first ignore all the indications coloured in red for now. Looking at the arrangement of the black and white keys of the piano keyboard, we quickly observe the emergence of a recurring pattern - 2 black keys to each other (I like to think of them as two little front teeth), followed by 3 black keys, and so on! Where we have no black keys separating the white keys on the keyboard, the distance between these two next-door white-key neighbours is considered a half-step. On the violin, we create this next-door relationship by having two fingertips line up next to each other, touching, on the fingerboard. Easy enough, so far!
Now, what’s important to note is that any single sideways movement on the piano keyboard, stepwise, is similarly counted as a half-step. This includes a white key going to a black key, and vice versa. But the music that we play isn’t only composed of single sideways steps! In order to quickly and efficiently create the other sort of standard measurement that we briefly mentioned before, all we need is to separate the two interested fingers at their base (in the palm) and create just enough breathing space to introduce a small window between the two fingertips, thereby creating a full step! Now, this all sounds very simple, in theory, but as our current VSG-ers can attest, being able to successfully and reliably pull up a full step between two fingers takes a lot of method, and practice! But that’s of course what I’m here for, to make your life easier by accompanying your violin-playing adventure with constant guidance and heartfelt encouragement! But, you get the point :)
Now, there’s obviously a lot more that goes into actually being able to read the music in front of you, and to understand what you’re seeing. But for now, I think this is more than enough information to start, but if you want to know more, why not get in touch with me, Cheryl, and see how I can help you along your very own violin-learning journey, in as logical and enjoyable a way as possible, all while living the beautifully diverse life you already have?
Write in to violinstudiogeneva@gmail.com and be sure to add our address to your contacts page, in order to be sure you get our response (and not have it lost in spam, for example… sounds funny enough, but it’s happened before).
But above all, ENJOY your time here with us, and HAPPY PRACTISING!!!
X.O.


